• Skip to main content
  • Skip to header left navigation
  • Skip to header right navigation
  • Skip to after header navigation
  • Skip to site footer
  • Facebook
  • Twitter
  • Instagram
  • YouTube
  • About Me
  • Collaborate
  • Privacy Policy
Babs Projects

Babs Projects

Recipes & Crafts for all

  • Home
  • Blog
  • Home
  • Crafts/DIY
  • Recipes
    • Appetizers
    • Beverages
    • Cakes and Breads
    • Chutneys & Condiments
    • Egg Recipes
    • Seafood Recipes
    • Sweets & Desserts
    • Non-Vegetarian Recipes
    • Vegetarian
  • Reviews
    • Reviews
    • Sponsored Posts
  • Fashion
  • Travel
  • Others
  • My SHOP
"Duck Tape Bow1"

Duck Tape Hair Bows

May 28, 2013 by Babita

Last Updated on May 28, 2013 by Babita

“TEE” made this fabulous and easy Duck Tape Hair Bows and asked me if I would feature it in my blog. I agreed on the condition that she writes the post herself.  So here it is in her own words. I have only edited it partially. ENJOY!!


Just recently, I participated in a math carnival at my school. For my probability project, I made around 50 bows. The person playing my game was supposed to pick a certain print and win prizes.  After the math carnival, I was stuck with a bunch of bows. I had no idea what I was going to do with them. Then one day, when I was playing around with some hair clips, I got an idea to combine these bows with with the clips and make Duck tape Hair Bows. If you want to know how to make these fabulous bows, here are the directions below:

1.) Cut a piece of printed Duck tape, about 4″ long. Fold it in half, and remember that there are pictures below to guide you!


"Duck Tape Bow2"


2.) Fold the small square in an accordion style, pinching the middle of the “accordion”. Before you pinch the middle, keep two small, thin strips of a base color cut and ready to use.


"Duck Tape Bow3"


3.) While pinching the bow with one hand, take one of the strips and wrap it around the middle. Once you have done that, flatten the middle as much as you can. Then, take the second strip and wrap it around the middle. The middle should be round.


"Duck Tape Bow4"


4.) Here is the finished bow!


"Duck Tape Bow 5"


5.) Take a hair clip add some glue to the bottom of the clip. The glue should be an industrial glue,  and the one I used was called   E-6000.


"Duck Tape Bow6"


6.) Place the bottom of the bow on top of the glue-covered area of the clip. Gently press for a few minutes.


"Duck Tape Bow*"


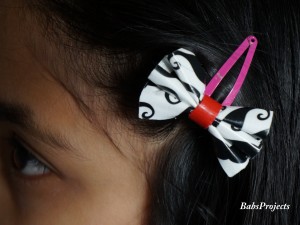
7.) Yay! Now you have a Duck tape hair bow all ready to show off to your friends!


"Duck Tape Bow7"


8.) I hope you enjoyed this tutorial! If you liked it, let me know by commenting below.


"Duck Tape Bow1"


Also check out my other Duck Tape Project:

  • Duck Tape Flower Pen


Spread the love
   7     
7
Shares
Category: DIY & CraftsTag: duck tape hair bows, duck tape projects, hair accessories, hair bows, projects for kids

About Babita

Previous Post:"Bridemaids Dresses"Target Now Sells Affordable Wedding Dresses
Next Post:Update on T-Shirt Dress Project Part 2T-Shirt Dress Update

Reader Interactions

Comments

  1. April

    May 29, 2013 at 9:23 pm

    Such cute bows and you make them look so easy to make. I have that glue and lots of clips I got for free from Walgreens last year, seems like it is time to make something with them.

    Reply
  2. Michele

    May 29, 2013 at 5:50 pm

    What a great idea!! Unusual to say the least–Duct tape has always been touted as something that can fix anything-now-it can be sued if you need a quick and inexpensive hair accessory!!

    Reply
  3. Terry (My Journey With Candida)

    May 29, 2013 at 11:16 am

    I have used duct tape for a lot of things but never Hair Bows. Very Nice!!

    Reply
  4. Kristi

    May 29, 2013 at 10:53 am

    I like these. My niece and nephew make lots of stuff with duct tape! You should sell them on Etsy!

    Reply
  5. Natalia via Facebook

    May 29, 2013 at 10:13 am

    So cute!

    Reply
  6. Natalia via Facebook

    May 29, 2013 at 10:13 am

    So cute!

    Reply
  7. BabsProjects

    May 28, 2013 at 6:28 pm

    Thank you Laurel

    Reply
  8. Laurel (@abubblylife)

    May 28, 2013 at 1:04 pm

    really cute!

    Reply

Leave a Reply Cancel reply

Your email address will not be published. Required fields are marked *

Sidebar

Welcome To Babs’ Projects

  I am Babita, an Indian-American mom with a passion for arts & crafts and do-it-yourself projects. Read More .....

BabsProjects.com is a participant in the Amazon Services LLC Associates Program, an affiliate advertising program designed to provide a means for sites to earn advertising fees by advertising and linking to amazon.com.

Popular Crafts

Decorative Cord Wrapped Christmas Vases – DIY

Grow Turmeric Plant Indoors in a Pot – Step by Step Pictures

Learn to Create these Easy and Cheap Food Photography Backdrops with Peel and Stick Vinyl Tiles

Photography Backdrop with Peel & Stick Vinyl Tiles – DIY

How to make Fabric Kundan Rangoli with Old Dupattas

DIY Coloring Hearts for Valentine’s Day

Decorate and Create Your Own Diwali Gift Boxes to Pack all the Sweet and Savory Snacks.

Create your Own Diwali Gift Boxes

MailChimp Pop-up

Inspiration

“Every day is another chance to get stronger, to eat better, to live healthier, and to be the best version of you.”

Recent Posts

Kimchi Rice with Fried Egg on Top
Rabdi Bites in Phyllo Cups on a White Platter
Mango Peda on a Black Platter
Close up Shot of Mango Modak Peda on a Black Platter
Close-up Picture of Mango Modak
Grilled-Tandoori-Mackerel

Copyright © 2025 · Babs Projects · All Rights Reserved ·

We use cookies to ensure that we give you the best experience on our website. If you continue to use this site we will assume that you are happy with it.Ok