Last Updated on March 11, 2016 by Babita
Like I mentioned in my previous post Pile of Fabric Scraps, I have tons of them lying around and I hate to just discard or trash them. I have been racking my brain to come up with some unique idea where I could really make use of them. Then I remembered my trip to Jaipur, India a couple years back. I had come upon a decorative cushion cover (or what I thought to be a cushion cover). In reality it was a fold-able ottoman, handmade with leftover scraps of fabric. So I decided to borrow the idea and make my very own Collapsible Fabric Storage Ottoman.
This storage ottoman is great for small spaces. You can stuff it with anything you want such as stuff toys, towels, bedsheets, fabrics etc. I wanted to make one to store all my girls stuff toys. The toys have literally taken over their bedrooms. This ottoman is functional as well as decorative and I thought it will serve us well. Since I only had a peek at it I really did not know how it looked or how it was made, but the idea was there and made sense, so I gave it my own spin. Check it out and let me know what you think
I began by cutting all the scraps into 5″ x 5″ squares (similar to the fat quarters you find in fabric stores). Then I organized them as per color…in this case all pinks were piled into one lot and all the blues into another lot.

Once they were organized, I pinned each square to the other keeping up with the same color pattern to make a long strip. Each strip had about 10 squares there by making it close to about 50” in width. (I know…I know, I should have measured them exactly, but I was too lazy to do that).

I then sewed the pink strip to the blue until I had about 4 strips and ended up with a rectangular shape. To smooth out all the edges, I ironed them on the wrong side.

On the wrong side of the fabric I also applied an iron-on white interfacing and then lined it with a layer of faux suede fabric to give it some stability (although in hindsight, I think that may have been a wrong move). The layer of faux suede made the body of the storage ottoman nice and strong with a luxurious feel, but for some reason was difficult to sew. I did however forcefully edge stitch it on all four sides.

Although I proceeded with the next step of sewing both the edge, I forgot to photograph it. Anyway once both the edges were stitched I apply both sides with Velcro and sewed the Velcro to secure it properly to the edge.


Done with the Velcro, I closed up both the edges by overlapping one edge over the other.

I set the body of the ottoman flat on the table and measure the width. I believe it was around 19″.

This next part was a complicated and I had to use some mathematical skills. Being mathematically challenged I found it engaging as well as frustrating at the same time. I needed two pieces of circular fabric for the top and bottom of the storage ottoman. Here is the formula and I hope it makes sense because I was ready to give up. Divide the Width by 2 and deduct 1 1/2″ (W/2 – 1 1/2″”). I ended up with 7″. To draw a circle, I took some paper (as you can see, it is a gift wrapping paper… anything you have on hand). I secured the measuring tape to the center of the paper with several pins. Then I moved the tape measure and started marking it at the 7″ all around. And that is how you draw a circle…

I know in the picture the mark looks at around 9″, but that is when I made a mistake. I redid the whole thing again with new measurement of 7″ all around and this time around it worked.

Place the circle pattern over two other pieces of fabric and then cut out the same. Remember I had challenged myself to make this from only leftover fabric, so I made use of the ones that closely matched the fabric of the body.


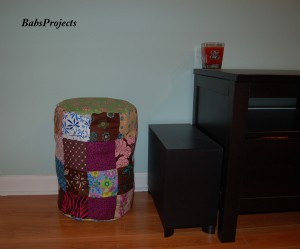
I also cut out two circular interfacing and ironed it on to both the fabric circles. Then turned the body of the ottoman and pinned it to the circle wrong sides together. I did it to both the sides and completed the whole thing by sewing it twice all around. To finish it I snipped off at every 1″ of the allowance. Here is the picture of it all completed.

I stuffed it with all the toys….. u can see Elmo peek out from there.

I stuffed it to the max, arranged the the toys inside to fill up the empty space and closed it up.


 Chicken Lollipop – Restaurant Style Chicken Lollipops
An awesome idea! Thank you for showing how to make it.It’s brilliant.
I love to make things out of scrap materials if I can make them look good. I love the idea, and thank you for sharing it with us today.
I love it It is beautiful. I had my doubts at first but you did a great jpb.
That’s really clever. You make it look so easy.
Those are great ideas! I like the patterns and the colors
I love the way it turned out!
I love this! It’s such a great way to use those pieces of fabric that would otherwise get thrown out! 🙂
That is a lovely combination of fabric. Thanks for sharing!
I have lots of fabric scraps that I could use up in projects like this. Thanks for the idea.
That is a great project from all of your scraps.
A great idea and good for recycling fabric too 🙂
Great stuff! The wife would definitely like this. Thanks for sharing!
This is a lovely idea!
This is such a great idea! It looks simple enough to do and is very creative!
I am so not crafty I’d never be able to do this. I love the finished product, very nice.
Wow! This is awesome! I would really love to do this but I don’t have a sewing machine.
I really do like this idea, I hope mind could hold up just as nice.
I love that. It really works well for stuffed toys.
What a great idea! I need to make like three of these and finally all the stuffed animals will have a good use… er, home.
Nice…..Very creative!!! Looks so useful n colorful ….