• Skip to main content
  • Skip to header left navigation
  • Skip to header right navigation
  • Skip to after header navigation
  • Skip to site footer
  • Facebook
  • Twitter
  • Instagram
  • YouTube
  • About Me
  • Collaborate
  • Privacy Policy
Babs Projects

Babs Projects

Recipes & Crafts for all

  • Home
  • Blog
  • Home
  • Crafts/DIY
  • Recipes
    • Appetizers
    • Beverages
    • Cakes and Breads
    • Chutneys & Condiments
    • Egg Recipes
    • Seafood Recipes
    • Sweets & Desserts
    • Non-Vegetarian Recipes
    • Vegetarian
  • Reviews
    • Reviews
    • Sponsored Posts
  • Fashion
  • Travel
  • Others
  • My SHOP
"Completed Pinboard"

How to Make Fabric Pinboard with Foam Board

April 14, 2012 by Babita

Last Updated on April 14, 2012 by Babita

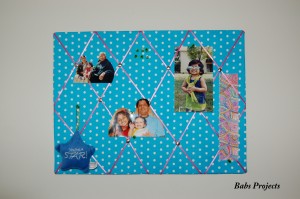
The Fabric Pinboard  for T’s room was finally done yesterday. I could have picked up one from either Walmart or Target, but where is the fun in that? So I made a pinboard similar to the ones available in those stores. The only difference is that those pinboards are made with cork. I made T’s pinboard from the humble foam board. It is so easy and if you have all the materials in hand, you can be done in an hour or two. I used the same fabric from the Lampshade Project . Check it out and as usual comments are always appreciated.

For this project I used 1/2″ thick foam board. As for the size, frankly I did not measure it as I was not very particular about the it. I just wanted to have a decent sized board. I then placed the foam board over the wrong side of the fabric and cut the fabric to size with an allowance of  approx. 2″ all around.


"Pin board Fabric"


I then took the cut fabric outside and sprayed it on the wrong side with Loctite  Spray Adhesive.  I immediately covered the foam board with it. I had a bit of difficulty doing the corners and with some proper manipulation was able to completely cover the foam board.


"Glued Pin Board Fabric"


For the next step, I used strips of very thin pink ribbons and pinned them diagonally all over the covered pinboard to make a diamond pattern. Once I was satisfied with the look, I glued the ribbons on the back side of the board with some fabric glue.


"Pink Ribbons"


To make the back of  the board appear all neat and perfect, I cut out a  piece of white cotton fabric. I sprayed it the spray adhesive and neatly pressed it over the board.


"White Fabric"


I then carefully glued some of the golden studs over the ribbons to secure them and for decorative purpose.


"Added Studs"


Of course, I needed something to hook it up on  to the wall. So I glued (superglue) this hook into the center of the board. I could have used two of the hooks and glued them on the sides, but I decided against it.


"Glued Hook"


After the  hook  had set, I and T went up to her room and secured it to the wall. T staged her pinboard currently with family pictures and in the futurehopes to pin up important (homework…:-)) reminders. I personally hope she makes good use of it and has fun with it.


"Completed Pinboard"


Spread the love
   22     
22
Shares
Category: DIY & CraftsTag: blue polka dotted fabric, cork, foam, foam boards, how to make fabric pinboard, make it yourself pinboard, pin up notes, pinboard to pin reminders

About Babita

Previous Post:"Veg Burger"Chickpea and Sweet Potato Burgers with Dill Cucumbers
Next Post:Agave Tortilla Warmer from Crate and Barrel"Orange Tortilla Warmer"

Reader Interactions

Leave a Reply Cancel reply

Your email address will not be published. Required fields are marked *

Sidebar

Welcome To Babs’ Projects

  I am Babita, an Indian-American mom with a passion for arts & crafts and do-it-yourself projects. Read More .....

BabsProjects.com is a participant in the Amazon Services LLC Associates Program, an affiliate advertising program designed to provide a means for sites to earn advertising fees by advertising and linking to amazon.com.

Popular Crafts

Decorative Cord Wrapped Christmas Vases – DIY

Grow Turmeric Plant Indoors in a Pot – Step by Step Pictures

Learn to Create these Easy and Cheap Food Photography Backdrops with Peel and Stick Vinyl Tiles

Photography Backdrop with Peel & Stick Vinyl Tiles – DIY

How to make Fabric Kundan Rangoli with Old Dupattas

DIY Coloring Hearts for Valentine’s Day

Decorate and Create Your Own Diwali Gift Boxes to Pack all the Sweet and Savory Snacks.

Create your Own Diwali Gift Boxes

MailChimp Pop-up

Inspiration

“Every day is another chance to get stronger, to eat better, to live healthier, and to be the best version of you.”

Recent Posts

Kimchi Rice with Fried Egg on Top
Rabdi Bites in Phyllo Cups on a White Platter
Mango Peda on a Black Platter
Close up Shot of Mango Modak Peda on a Black Platter
Close-up Picture of Mango Modak
Grilled-Tandoori-Mackerel

Copyright © 2025 · Babs Projects · All Rights Reserved ·

We use cookies to ensure that we give you the best experience on our website. If you continue to use this site we will assume that you are happy with it.Ok