• Skip to main content
  • Skip to header left navigation
  • Skip to header right navigation
  • Skip to after header navigation
  • Skip to site footer
  • Facebook
  • Twitter
  • Instagram
  • YouTube
  • About Me
  • Collaborate
  • Privacy Policy
Babs Projects

Babs Projects

Recipes & Crafts for all

  • Home
  • Blog
  • Home
  • Crafts/DIY
  • Recipes
    • Appetizers
    • Beverages
    • Cakes and Breads
    • Chutneys & Condiments
    • Egg Recipes
    • Seafood Recipes
    • Sweets & Desserts
    • Non-Vegetarian Recipes
    • Vegetarian
  • Reviews
    • Reviews
    • Sponsored Posts
  • Fashion
  • Travel
  • Others
  • My SHOP
"Upholstery Complete"

How to Upholster Dining Room Chairs

May 17, 2013 by Babita

Last Updated on May 17, 2013 by Babita

Finally, I was able to find some time to work on my dining room chairs. Last couple of weeks was very busy. I was juggling around 3-4 different projects. So, this week I decided to give myself a little break to focus only on upholstering the dining room chairs. I think the chairs with their final makeover looks great, but that is just my opinion. Let me know what you think of this project.

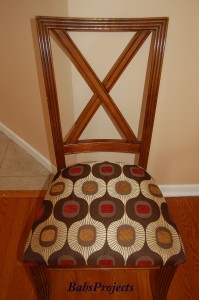
This is the before image of the chair. I had previously upholstered the chair pad about five years back. Even though I loved the fabric at that time, I am not crazy about it anymore. The fabric looked like faux suede. It was attracting dust, had started to pill and was getting difficult to clean and I had to get rid of it.


"Dining Room Chair Makeover"


Obviously the first thing to do was to unscrew the chair pad from its wooden bones. So I turned the chair upside down and unscrewed the five screws with the help of a Philips screwdriver.


"Undo Chair Screw"


"Undid all the ChairPads"


Once I removed the chair pad, its was time to take out the old staples pins. I found the easiest way to do that was to use a flat head screwdriver. I removed all the pins and threw the old fabric as well as the staple pins in trash.


"Remove Old Staple Pins"


Then armed with a handy staple gun I proceeded to cover the chair pad with this gorgeous fabric that I found in Jo-Ann. I have to admit that this fabric was not my original choice. I had originally gone to Calico Corners and picked a fabric from there. I found out that I would have to wait for at least a month to get my fabric. I told the sales person at Calico Corners to cancel my order. There was no way I was going to wait that long. Of I went to Jo-Ann and absolutely fell in love with this fabric. It was expensive at $88 per yard. I was lucky. Jo-Ann had 50% off on all upholstery fabric, so I was able to get two yards for $88. That was just the amount of fabric I need for this project.


"Upholstery Fabric"


After placing the fabric wrong side up, I positioned the chair pad over it. I gathered the fabric over the chair pad on one side and stapled it. I did this on all sides, so as to secure the fabric in place. Of course, I wish I had three hands to do that.


"Stapling the Fabric"


Let me tell you stapling the sides are easy. The worst was yet to come. The corners are an absolute pain. I had to make sure I had gathered them properly without a lot creases and had to pin them several times. Well, I am not an expert but I did try my best. Check out the back of the finished chair pad below.


"Completed Stapling Fabric"


All done with the upholstering bit, I screwed the chair pad back on.  I did the same for the other three chairs. Although, it looks easy and quick when I am typing over here, it took about 2 days to complete it. I was over the moon with this transformation. The colors on the fabric went along great with the dining table as well as the surrounding walls and curtains.


"Upholstery Complete"


As for the nicks and scratches, I will deal with them some other time. For now let me ENJOY my chairs.


"Upholstered Dining Room Chairs"


If you enjoyed this post, make sure you check out my other projects:

1.  IdeaPaint Dry Erase Whiteboard
2. Toddler Bike Makeover


Spread the love
         
Category: DIY & CraftsTag: Calico Corners, dining room chair makeover, how to upholster dining room chairs, Jo-Ann fabrics and Crafts, upholstery fabric

About Babita

Previous Post:The Day After Mother’s Day
Next Post:Target Now Sells Affordable Wedding Dresses"Bridemaids Dresses"

Reader Interactions

Comments

  1. Terry (My Journey With Candida)

    July 3, 2013 at 4:48 pm

    Love the new look. Thank goodness my chairs are new and I won’t have to do this for awhile.

    Reply
  2. Babita via Facebook

    July 3, 2013 at 4:46 pm

    Thanks Terry Macri

    Reply
  3. Babita via Facebook

    July 3, 2013 at 4:46 pm

    Thanks Terry Macri

    Reply
  4. Terry via Facebook

    July 3, 2013 at 4:45 pm

    Great Job!!

    Reply
  5. Terry via Facebook

    July 3, 2013 at 4:45 pm

    Great Job!!

    Reply
  6. Babita via Facebook

    July 3, 2013 at 4:43 pm

    Thanks Shari and Anne..

    Reply
  7. Babita via Facebook

    July 3, 2013 at 4:43 pm

    Thanks Shari and Anne..

    Reply
  8. Anne via Facebook

    July 3, 2013 at 4:42 pm

    Oh, wow…. this is GREAT info!!

    Reply
  9. Anne via Facebook

    July 3, 2013 at 4:42 pm

    Oh, wow…. this is GREAT info!!

    Reply
  10. Shari via Facebook

    July 3, 2013 at 4:42 pm

    Really cool project! We have to do ours soon since our cats have poked holes in the seats.

    Reply
  11. Shari via Facebook

    July 3, 2013 at 4:42 pm

    Really cool project! We have to do ours soon since our cats have poked holes in the seats.

    Reply

Leave a Reply Cancel reply

Your email address will not be published. Required fields are marked *

Sidebar

Welcome To Babs’ Projects

  I am Babita, an Indian-American mom with a passion for arts & crafts and do-it-yourself projects. Read More .....

BabsProjects.com is a participant in the Amazon Services LLC Associates Program, an affiliate advertising program designed to provide a means for sites to earn advertising fees by advertising and linking to amazon.com.

Popular Crafts

Decorative Cord Wrapped Christmas Vases – DIY

Grow Turmeric Plant Indoors in a Pot – Step by Step Pictures

Learn to Create these Easy and Cheap Food Photography Backdrops with Peel and Stick Vinyl Tiles

Photography Backdrop with Peel & Stick Vinyl Tiles – DIY

How to make Fabric Kundan Rangoli with Old Dupattas

DIY Coloring Hearts for Valentine’s Day

Decorate and Create Your Own Diwali Gift Boxes to Pack all the Sweet and Savory Snacks.

Create your Own Diwali Gift Boxes

MailChimp Pop-up

Inspiration

“Every day is another chance to get stronger, to eat better, to live healthier, and to be the best version of you.”

Recent Posts

Kimchi Rice with Fried Egg on Top
Rabdi Bites in Phyllo Cups on a White Platter
Mango Peda on a Black Platter
Close up Shot of Mango Modak Peda on a Black Platter
Close-up Picture of Mango Modak
Grilled-Tandoori-Mackerel

Copyright © 2026 · Babs Projects · All Rights Reserved ·

We use cookies to ensure that we give you the best experience on our website. If you continue to use this site we will assume that you are happy with it.Ok