Last Updated on May 11, 2024 by Babita
Baked Mishti Doi is a Bengali dessert made with yogurt. Mishti Doi is also known as Mitha Dahi meaning sweet yogurt. This is one of those recipes that belong to the category “I inherited this recipe from my friend’s friend. Before coming to the US I had not even heard about this recipe. One of my friends served it at our ladies get-together and I got the recipe from her. The ease and simplicity of this recipe has made me a fan and I have been making it for some years now.
What is Baked Mishti Doi
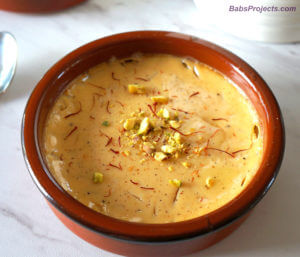
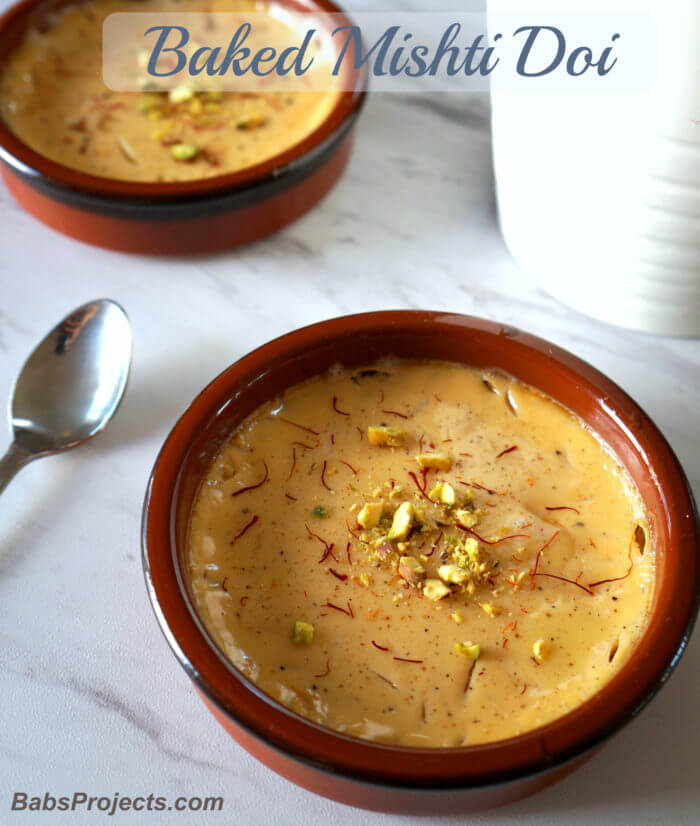
Mishti Doi is a traditional Bengali dessert, commonly found in the Indian state of West Bengal and also Bangladesh. It is a classic recipe which includes milk which is thickened and sweetened with either sugar, jaggery or date molasses and combined with yogurt. This mixture is then allowed to ferment overnight in earthen/clay pots. It is made especially during religious holidays and weddings. It has a pudding-like creamy texture and I like making it a day ahead of the event.
The traditional process of thickening milk by boiling is time-consuming and requires effort. That is one of the reasons, you will find this dessert only in the sweet shops. However my friend’s friend’s recipe for Baked Mishti Doi can’t get any simpler. It requires 3 main ingredients and the preparation is even better and simpler. Even if you have never cooked or baked in your life, you will be able to make this dessert. So check it out and watch the video below.
Ingredients for Mishti Doi
1 1/2 cup yogurt
1 can evaporated milk
1 can condensed milk
a pinch of cardamom powder (optional)
For Garnish
Chopped pistachios (optional)
Few strands of saffron
Preparations:
- In a mixing bowl combine yogurt, evaporated and condensed milk. Whisk it thoroughly.
- Pour it into a baking dish or ramekins.
- Sprinkle cardamom powder over it.
- Bake it at 350 degrees for 30 mins (ramekins) or 45 mins if using a baking dish.
- Remove from oven and set aside. Once it has cooled down garnish with chopped pistachios and saffron threads.
- Refrigerate it for 2 to 3 hours before serving.
Disclosure: This post contains affiliate links
 Mitsuwa Marketplace, Little Japan in New Jersey
Hi, anxious to try this.
How many cups of evaporated and condensed milk should I use?
Please check the recipe card at the bottom.
Thank you so much for sharing this great recipe! It was Navratri and Durga Puja last week and I started getting nostalgic about mishti doi which as you know is so hard to find here in the US, so this recipe was such a blessing!
I have a question —- I made this recipe in a glass casserole, and baked it at 350 for 45 minutes, and although the taste was just like the real mishti doi, the texture only became thick/solid on the top, the bottom remained soft and mushy, so should I bake it for longer duration?
Thank you!
After you bake it pop it into the refrigerator. For best results keep it in the fridge overnight. This will help it solidify all the way through.
Thank you for your feedback!
Such a simple but great dessert to follow other Indian food.
As I had left over condensed milk, I have just made some that I don’t really need and wonder if I can freeze it?
Yes you can freeze them. There will be a slight change in texture when you thaw them and that is expected.
This turned out so perfect.
Thank you for your feedback
Loved this recipe, tasted so good! The only question I have is, how did you get the yellow-ish color?
Thank you Susan. After it is baked it has an off-white color. The yellow must be because of the lighting in the video.
Hi Babs Projects, can you pls tell me what the temperature will be in Celcius? or is this in Celcius… (350 degrees?)
Thanks
Hello Rukshana, The temperature I use is in Fahrenheit. So it is bake at 350 degrees F for 30 to 45 mins.
Hi there
When you say 1 can of evaporated milk what is that in mls or fluid ounces. Here we get two different sized cans in the shops
Hi Priya, one can of evaporated milk over here is around 12 oz or approx 1 1/2 cup (US measurement). So this is the amount to use for this recipe.
Hi,
For this recipe, no need to preheat the oven right? I’m so new to making/baking yogurt…
Hello Naz, that is a good question. No you do not have to pre-heat the oven for this recipe. Good luck with your baking 🙂
This was the best yogurt recipe so far. Thickness was perfect. Thank you so much Babs.
If I want to make in large batch suppose with 1 liter milk, how much yogurt I need to add? Does it need more cooking time?
Hello Naz, you can try by doubling this recipe. Also cooking time will be the same. Just use a longer baking (something like 9″ x 13″) pan.
Hi, is this using live yogurt?
Nas, I did not understand your question. What do you mean by live yogurt? However, I will say that you can use homemade or store-bought yogurt to make this.
Sorry. I meant natural yogurt
Yes, you can use that.
This Mishti Doi is the best ever and the simplest recipe.Highly recommended.My family and friends are all gaga over it.Thank you for this beautiful recipe.
Thank you Winnie for your feedback!
This is by far the tastiest and easiest doi recipe! I have tried making mishti doi before using other recipes but haven’t had much luck. I found the other recipes complicated especially the baking and cooling procedures. This recipe is just so easy to follow and the ingredients are so simple. I have made it about 6-7 times by now! It comes out perfect every time! Thanks so much Babita for the amazing recipe!
Thank you Shawon